Have you made your first swatch from Episode 3 yet ? Great ! Take it in front of you and let’s explore all the differences we can find between
– dc in both loops
– dc in 3rd loop
– front post dc
– back post dc
(all worked in rows at this stage)
1/ TEXTURE & VISUAL APPEARANCE:
The most obvious difference is in the texture and visual look.
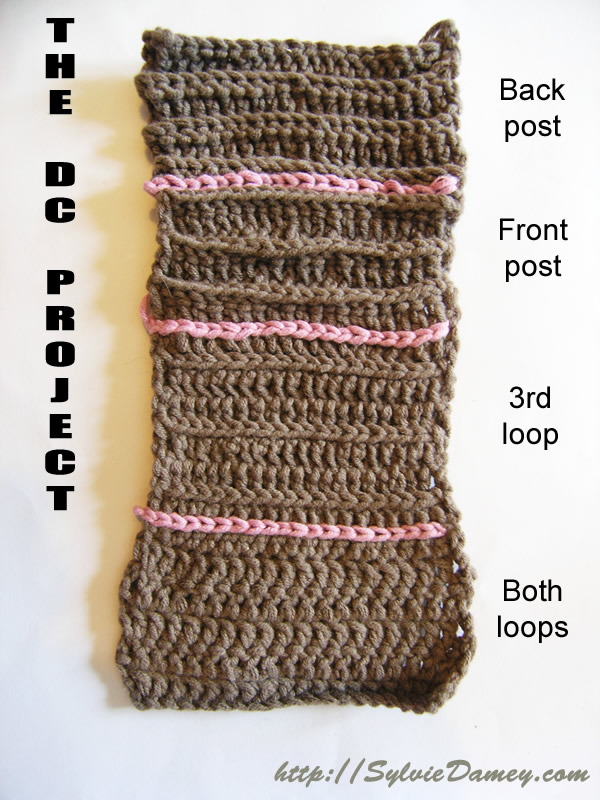
dc in both loops => flat surface, stitches look neatly stacked on top of each other
dc in 3rd loop => slightly undulating surface, reminiscent of the dc in front loop. Visible “braid” every 2nd row (= easy to count rows !), on top of which fabric folds easily. Intersting to note: the posts of each stitch looks slightly twisted sideways, making them look different than dc in both loops: more texture, not so flat.
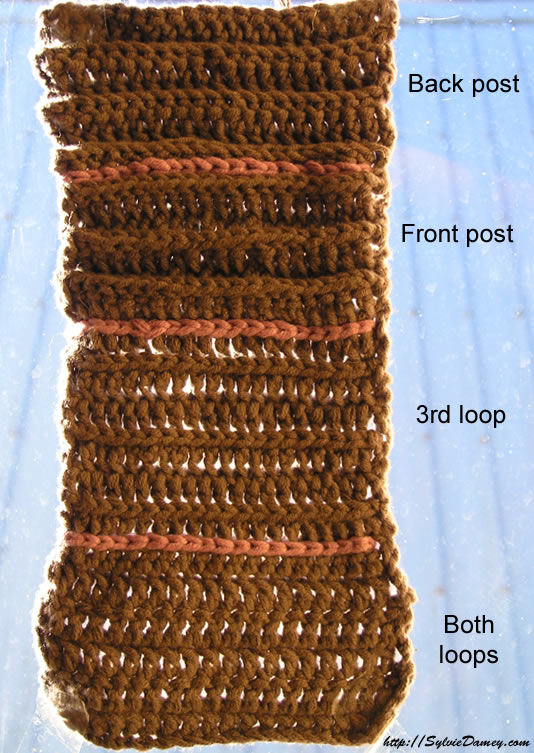
Also, when looking at the light coming through our swatch, we see that the gap between each stitch is at least similar to the one in between each dc in both loops, if not larger.
 (click for full size)
front post dc => a lot of texture !! With deep ridges and crevices… The ridges here are relatively centered in between each “crevice”. Fabric is dense, with hardly any light coming through the stitches.
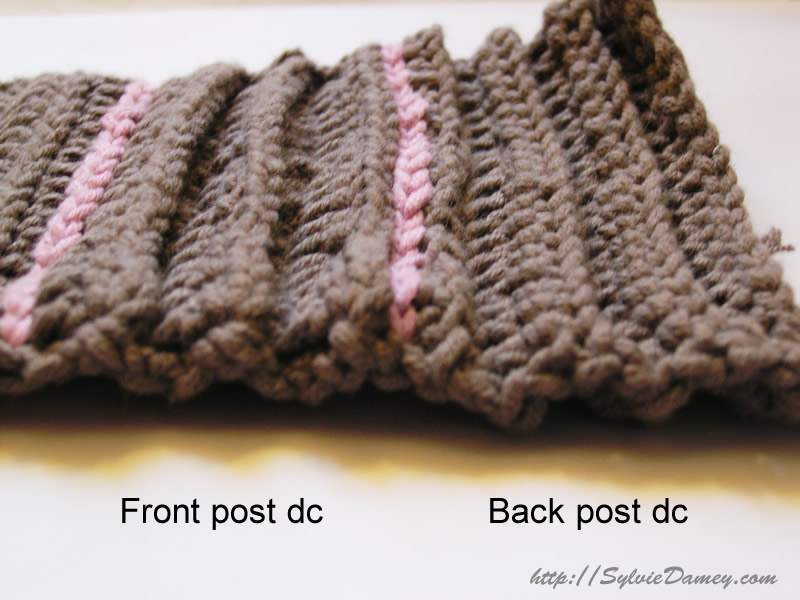
back post dc => here again, a lot of texture with high ridges. Yet the result looks quite different from front post dc: the ridges are here located very high in each set of 2 rows, creating quite a sharp edge after it. It’s interesting to compare this stitch to dc in the back loop: pretty similar look, although the ridges of front post dc are much more marked.
Fabric is also dense, with hardly any light coming through the stitches.
2/ SIZE
Let’s take measurements of each section of your swatch. Here’s what I found on mine, measuring over 15 sts and 4 rows :
(reminder: I used the same size of hook to crochet each stitch variation!!)
dc in both loops => width 9.7 cm – height 4.5 cm => Let’s use this as our reference measurements.
dc in 3rd loop => width 7.5 cm – height 4.6 cm => dc in 3rd loop is 29% narrower and 2% higher than dc in both loops.
front post dc => width 7.2 cm – height 3.2 cm => front post dc is 35% narrower and 40% shorter than dc in both loops.
back post dc => width 7.7 cm – heigth 3.1 cm => back post dc is 26% narrower and 45% shorter than dc in both loops.
Now, here are again some very intersting results !
– dc in the 3rd loop may look quite similar to dc in front loop, yet it doesn’t stretch as much vertically at all ! When you touch it, you’ll realise the fabric is thicker than dc in front loop, which explains the difference in height.
– front post and back post dc have SO MUCH texture that they loose as much in height. If making a project using one of those stitches, you’d need more rows to make it the right height… which is good to know (I love dc BECAUSE it’s a tall stitch working up quickly).
3/ STRETCH & DRAPE
Now, those parameters are more difficult to assess on such a small swatch. But here’s what I learnt from experience. You can also stretch your swatch in all directions to notice the differences:
dc in both loops => solid fabric. sturdy. does not stretch much vertically.
dc in 3rd loop => stretches horizontally, but not vertically. The folding lines sitting on top of horizontal braids every 2nd row lets it gently follow along curves.
front post dc => Quite the opposite from what you’d think… but this stitch has very limited stretch. It does stretch more vertically than horizontally. Quite sturdy structure. But does fold easily along the ridges.
back post dc => Very little vertical stretch, a little more horizontal stretch. This stitch will also easily fold along its ridges to follow curves, although it doesn’t have any proper drape.
4/ BEST USES
Now, with all these parameters in mind, let’s try and see which types of project use each variation of the dc :
dc in both loops => see conclusions of episode 2
dc in 3rd loop => because of its horizontal stretch and pretty decorative braids, I could totally see myself crochet a grocery bag with this stitch, or add a few decorative rows along bottom edge of a sweater.
front post dc => you could probably find uses to take advantage of its unique texture. This stitch is VERY usefull and widely used to crochet CABLES.
back post dc => here again, you may find decorative uses for the high texture of this stitch. I would not recommend it for clothing though. Again, this stitch is widely used to crochet CABLES.
5/ WORKING IN THE ROUND
Working in the round changes the visual aspect of all 3 of those stitch variations. I’ll explore this in a further episode…
*********************************************************************************************************************************************
How about YOU ? Anything I forgot or didn’t see in those swatches ? Please share in the comments !
*********************************************************************************************************************************************
DC project Episode 1
DC project Episode 2
DC project Episode 3
DC project Episode 4
DC project Episode 5