
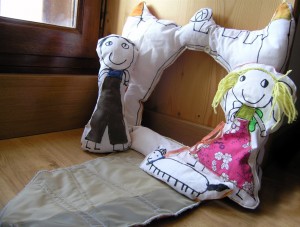
This morning, the girls were trying to find an occupation, and decided they wanted to “sew a princess”. I said fine, start with making your pattern/template then (which let me enough time to finish breakfast).
The princess first had no feet, and then had 4. A family of bugs it would be then 🙂 A prince was then drawn, and a bug-dog. Along with a castle for them all.


We drew, cut, sewed, filled with polyfill, cut some more, sewed some more… And ta da by noon we had a castle, princess and prince !! And beware when asking for the door to open, or you might be surprised: some of the bad guys got smashed under the heavy door this morning 😉
The girls haven’t had much time to play with it yet, but they alreay love it. I can see how this is going to be hours of fun and endless stories… Plus it was fun to make of course !!! 😀


As for the details, if you’d like to make one:
– I copied my daughter’s drawings onto a white sheet with permanent black marker, cut about 1′ around the whole figure.
– Cut some “clothing” in a different fabric which I zigzag-sewed onto main “doll”.
– Sewed main doll (white fabric) with a colored back fabric, with right sides together. Left an opening to turn inside out.
– Girls turned their doll inside out, and stuffed it with polyfill.
– Closed the opening with sewing machine (or you could handsew it, but I was lazy)
– For the castle, I sewed an extra door, with padded fabric. Zigzaged around door on main fabric, and cut inside to create opening. Attached the padded door to bottom of door-opening, and added button and buttonhole to top of padded door.
What fun – very creative. And for Christmas… crocheted crowns? 😉